| Table of Contents | ||||
|---|---|---|---|---|
|
This is the home page for our effort to validate the MEGA65 firmware and system software for the Q4’2022 shipping batch, known as “release 0.95.” If you have a batch #1 MEGA65 (“R3”) or a Dev Kit, or a Nexys 4DDR board, you can help!
...
Current release candidate
Latest release candidate SD card contents (possibly newer than in the release candidate archive):
...
If you have a JTAG connector:
(Consider doing the slot 1 tests, below, before installing the core into slot 0.)
Flash the COR into slot 0. (See instructions below.)
Test the configuration utility.
Hold ALT while powering on.
Test RTC setting. See updated date formatting.
Test MAC address: press R to randomize.
Test the onboarding utility.
From configuration utility, Exit and Reboot to Onboarding.
Test RTC setting. See updated date formatting.
Test the core utility.
Hold NO SCROLL while powering on.
Try installing different cores in different slots.
Press HELP to get version information. (If HELP asks for a file, you have an old version of the flasher.)
Try to break it!
Press and hold random keys while powering on.
Install the COR into slot 1.
Copy the COR onto the SD card.
Hold NO SCROLL while powering on to enter the core installation/selection menu.
Press Ctrl + 1, then select
mega65r3MEGA65R3.corCORand follow prompts to install the COR in slot 1.
With the COR in slot 1:
Hold ALT while powering on to access Configuration. It should say v1.0, using the Configuration menu from the slot 1 core.
Hold ALT while powering on to access the SD Card utility. It should say v0.24, using the SD Card menu from the slot 1 core.
Prepare a fresh SD card using the sdcard-files provided in the release candidate download.
Linux and macOS: Use the copy-flash.sh script to install the files onto a previously-prepared SD card. (This copies the files with the recommended defragmentation technique.)
If you have a full-size SD card that you’re willing to fully erase:
Open the case and insert it into the internal SD card slot.
Use the SD Card utility (from the Alt boot menu) to prepare, erase, and install the system software in the internal slot.
Move the SD card to your PC and install all files from mega65-release-prep.
Eject it from your PC and reinsert it into the internal SD card slot.
This (plus the core in slot 0) is the complete launch configuration for batch #2.
Test all programs on the MEGA65.D81 disk.
Test GEOS65.D81 (included in mega65-release-prep).
Try the Turrican Engine Demo by Shallan.
Test other programs that you use, develop, or own.
How to flash a core to slot 0
Note: there is a updated version here Slot 0 Upgrade (Work in Progress)
You must use the m65 command line tool (the “refactor” version). Using M65Connect will currently not work!
Copy the latest release COR file to the SD card, using a short filename such as
R3RC1.COR.
Make sure that you also have all required files on your sdcard, as using jtagflash needs a running MEGA65 System!Turn off your MEGA65.
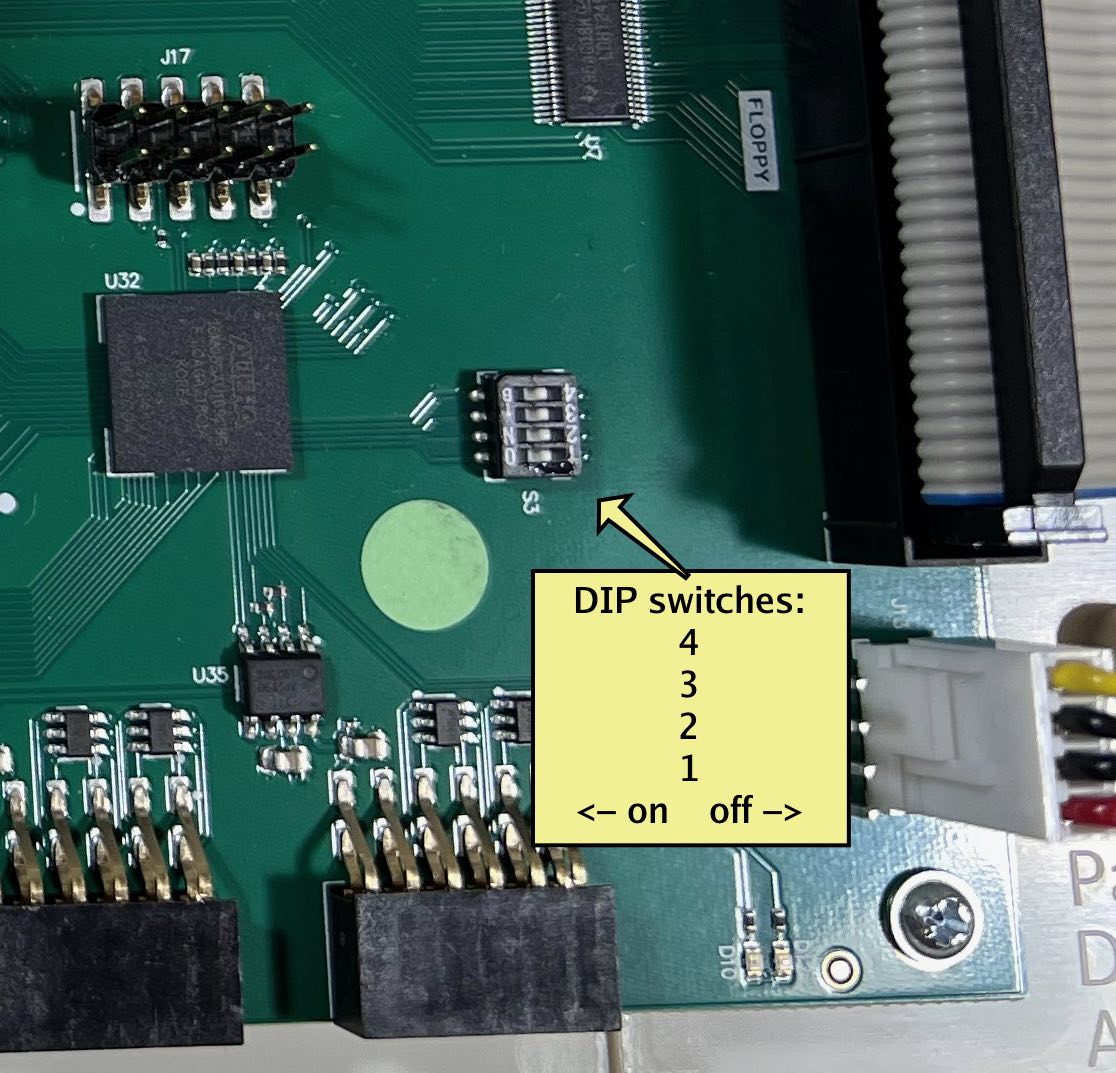
Set DIP switch 3 to ON. (Switch 1 is closest to the front of the case. “ON” is to the left.)
Make sure your JTAG interface is connected to the MEGA65 main board, and to your PC.
Turn on your MEGA65.
MEGA65 will notice that DIP 3 is on. Press Run/Stop when prompted.
The monitor appears. Press x then Return to exit the monitor to the READY prompt.
Use m65 tool to push the BIT file via JTAG to your MEGA65. If this fails, stop here.
m65 --bitonly mega65-reltest/mega65r3-2022XXYY.ZZ-abcdefg-89fdecb.bitThis will give you an output like:
Code Block ograf@vlad$ m65 --bitonly mega65-reltest/mega65r3-2022XXYY.ZZ-abcdefg-89fdecb.bit 2022-09-23T08:35:35.074Z NOTE MEGA65 Cross-Development Tool 20220919.23-refact-bf8ded4~ 2022-09-23T08:35:35.112Z NOTE selecting device /dev/ttyUSB1 (Digilent; 0403:6010; 251633006E10; 03636093) 2022-09-23T08:35:35.228Z NOTE fpgajtag: Starting to send file 2022-09-23T08:35:38.759Z NOTE fpgajtag: Done sending file 2022-09-23T08:35:38.776Z NOTE Bitstream loadedNote the second line:
selecting device /dev/ttyUSB1
What is printed there is the device you need in step 12.Repeat steps 7 and 8 to return to the READY prompt.
Use m65 tool to start
jtagflash.prgin C64 mode. It is also possible to start jtagflash.prg from a D81 image.Download jtagflash.prg (Discord link, Sept 22)
m65 --device <YOURDEV> --c64mode --run jtagflash.prg
Note: you must specify the device, because the autodiscovery will reset the JTAG!
Press Return at the three jtagflash prompts.
Select the COR file you put on your SD card (we used
R3RC1.CORabove).Wait for flashing to complete.
Turn off your MEGA65. Set DIP switch 3 to OFF.
The test core is now in slot 0. Next in the test procedure would be booting the system into MEGAFLASH by holding NO-SCROLL and then powering on the system. There you can flash slot 1 with the same core you just did put into slot 0.
...